Job done!

After flying MYRO into Stoke yesterday for its check flight, there wasn’t much I had to do today. Except be there and shoot a video of the event because it’s not that often that you get the chance to take pictures of your own aircraft, in the air 🙂

Everything went off really smoothly despite the fact that the wind kept picking up more and more until not only was it blowing at around 15-20 knots or so but there was also a bit of a crosswind from the left as the video shows. So many thanks to Martin who did the check flight for taking it on at all, and for completing it so professionally and safely. You can see the video by clicking on the image below.

null

We sorted out all the permit paperwork in the clubhouse afterwards so all I’ve got to do now is send it all off to the BMAA at Deddington with the cash! It was great just being there too because although I’ve been a Stoke member for months, I haven’t had that many chances to hang out in the clubhouse because of working on MYRO over the last four or five months. Hopefully all that will now change 😉

By the time I went across to cover and tie MYRO down, the wind was blowing really strongly so I also tightened the covers on the X’air and put a bit of tension into its and the tie-down ropes of another AX3 that is next to MYRO which had loosened in the wind. So that’s it, job done now bar waiting for a few days for the permit to come through after which I look forward to getting in a bit of safe and enjoyable flying in MYRO. And best wishes also to Rosemary and Tony H-S (Essex Flyer) who had a prang in their Rans just after I did in MYRO. They missed most of the Summer flying too but the Rans is now back in the hangar and Tony is also now just waiting for its permit to drop through his letterbox. Let’s hope we’ll both not be waiting for too long 🙂

Phew!

I followed my plan through pretty much to the letter today. Bought fuel and made up a 20 litre jerry can of 50:1 2-stroke mix on my way over to Ken’s and on arrival there, uncovered MYRO and topped up the tank. The flight to Stoke is only a 20 minute one but it’s always nice to know you’ve got plenty of fuel in case you have to turn back or divert for any reason. Then we pushed MYRO into the field and I gave it a really thorough walk round inspection. My original idea was to give it another 30 minutes of ground running and power checks but after 10 minutes or so the engine was running and powering up so smoothly that I didn’t think it was necessary doing any more.

Ken then had to pop out for 15 minutes or so, so while he was away I got MYRO ready for the flight and was all ready at the top of the slope at the high end of the field with the engine running when he got back. I have to say that from there the field looked a lot shorter than it did before and although I knew that MYRO would accelerate like mad down the slope to take off speed, there’s always that little doubt in your mind that something could go wrong. I knew that if there was any doubt, I’d have to close the throttle very quickly to give myself enough time to stop on the damp grass before running out of field, but having made that decision I found that it wasn’t then the foremost thing in my mind as I put on full power and accelerated away. I didn’t even notice at what point I became airborne – Ken said afterwards that it was in 40 yards or possibly even less – I just watched the Ts and Ps and airspeed as usual and took off at the normal speed.

I’d decided beforehand that if I’d had an early EFATO I’d have no choice but to turn right onto a newly ploughed field – there was nowhere else to go – but once it was apparent that that wasn’t going to happen, I concentrated on climbing away through the gap in the trees to gain as much height as I could as quickly as possible. I also turned left to stay clear of neighbours’ houses and really that was all there was to it. It was exciting to be the first person ever to take off from the field and also to be doing my first down-slope take off, but otherwise it was fairly uneventful. But that’s just how you want it to be, isn’t it? No heart-stopping moments, no high drama. And that’s what your planning is all about achieving.

The vis on the flight across to Stoke, which did indeed only take 20 minutes, was terrible, but I know the area and all the landmarks so well that it wasn’t a problem. Pretty soon I was calling up to join overhead for runway 06 and my circuit and landing was just routine, mainly because the wind was so light.

So how did MYRO perform? I seriously do believe that MYRO flew better and more balanced than it did before the accident. Maybe it is now rigged a bit better than it was, I don’t know but what I do know is that I’ve tightened up the rudder cables a bit and it definitely seems more stable now in yaw than it was. I found before that on final, for example, even in fairly light winds, it was possible for the nose to go into a side-to-side oscillation which you had to quickly nip in the pad by quite rapid and powerful rudder inputs. I didn’t feel that happening today and in fact the final approach to 06 was rock solid all the way down. I hope I’m right because it will make flying MYRO even more enjoyable than before. I mentioned to Ken while I was covering MYRO up for the night that while I was doing the repair I was worried that MYRO would never be the same again. I think I was right. It’s even better now 😀

Tomorrow? Maybe…

Well, MYRO’s insurance comes into effect from a minute past midnight tonight so in effect, I can now fly out of Ken’s any time I want to. The weather for Saturday looks as though it could be a bit ‘iffy’ with wind from the south-west together with a few gusts, but although tomorrow there could be a bit of low cloud, the wind is forecast to be north-easterly and fairly steady at 7-8mph. Now that would suit me much better as it would be blowing up the slope on the field where I have to take off and almost straight down runway 06 at Stoke where I have to land and given how long both MYRO and I have both been out of the air, the easier and safer I can make the whole exercise, the better I will like it.

So tomorrow looks to be a much better day for ferrying MYRO across to Stoke for its check flight. I have an appointment about mid-morning but I think the best thing would be for me then to take the rest of the day off and do the flight. The field at Ken’s is an unknown quantity at present and although we know it should be OK taking off there downhill even with a bit of a tailwind, I’d rather not be trying it out on MYRO’s first flight after the repair, even knowing what good shape MYRO is now in. So now all I can do is wait and see if tomorrow morning the ‘actuals’ line up with this evening’s forecast and take it from there. Fingers crossed eh 🙂

Really close now

After my disappointment with Joint’s insurance quote I was delighted to receive a really good quote direct from Crispin Speers and Partners this morning which I’ll be taking up tomorrow. The weather forecast for the next couple of days is not too hot but things look as though they’ll be improving as from Friday with Saturday hopefully quite a nice day. That means I should be able to ferry MYRO across to Stoke for its check flight and I can hardly believe the day is almost here 🙂

As I type this the rain is pattering onto the conservatory roof and I’m glad that I’ve got MYRO’s covers on. I think though that when I’ve got the decks clear I’ll make another cover for the whole of the tail plane along the lines of the design of the X’air’s one and also one for the pod and screen. That way MYRO will be able to stand out this Winter and not be too affected by the weather. I think that a bit too much was left uncovered last year and I’d like to rectify that if I can.

It’s a nice feeling to know that all of the final pieces of the jig-saw that was started back in May are now beginning to fall into place 😉

News – some good, some not so..

There were two bits of good news today. MYRO whizzed through its permit inspection this afternoon, which was very satisfying after all the work I’ve put in, and also doesn’t have to be re-weighed after the repair as standard AX3 parts were used to replace the items that were damaged. Chris is usually a bit uncomplimentary about ‘old AX3s’ but even he had to admit that MYRO ‘is a nice bit of kit’ now, which was very pleasing.

On the other side of the coin, I had been hoping to get an attractive quotation for insurance from Joint Aviation but to no avail. Joint took over with the broker that On-Risk had been using and when I needed to take out insurance last year it was in the change-over period after On-Risk had finished and before Joint had taken over. So I insured with Crispin Speers at a cost that was quite a bit higher than On-Risk had been charging for similar cover and after Joint had taken over, the lower cost premiums returned again. But that was too late for me and I missed out. Well, it looks as though it’s happened again! I contacted Joint and was told that the original broker isn’t taking on any new business and that they have had to start using a new one. The premiums required by the latter are something like 100% MORE than previously, so whereas I was expecting to be quoted £500 or so for the cover I need, in fact the figure was around twice that! So even though I can now ferry MYRO out of Ken’s over to Stoke for its check flight, I certainly won’t be doing it this week-end as I won’t have any insurance in place. Typical 😐

And there was another bit of bad news too. After the inspection, I thought I might as well empty the fuel in the jerry can into MYRO’s tanks. After I had done so, I watched the levels in the two tanks and there was absolutely no transfer at all from the main into the second tank. It appears that by bending the rubber outlet from the second tank to reduce the bulge in the rear fuselage cover, I’ve kinked the tubing even though it is of large bore and appeared unkinkable. So it’s back to the ruddy drawing board again. I’ll still put the mod through but I think I’ll try and get hold of another standard AX3 tank that doesn’t have its outlet coming vertically out of the bottom, which is the source of all these problems. Maybe it’s why the previous owner got rid of it, I don’t know. I suppose I could try reverting to my previous arrangement with slightly smaller bore tubing with a copper elbow below the second tank, which seemed to avoid the problem. As the flow problem then was apparently due to the outlet from the main tank collapsing when the clip retaining the rubber tube to it was tightened and not strictly to the bore of the tubing itself, that could be a way to go. I’ll have to think about it for a bit.

Oh well… at least MYRO has now got through permit inspection, which is another big milestone not to be sniffed at 😕

Weight and C of G Calculations

When MYRO has its permit inspection, it’ll also have to be re-weighed. This will be necessary even though it was only weighed in August last year because several replacement parts have been used in the repair which may affect the weight. It’ll also be complicated by the fact that I have added the second tank and want to put that mod through at the same time. The BMAA Weight and CG Report is quite complicated and has to be completed and sent in by the inspector but I want to be able to do my own calculations in parallel, as I did last time, and also get a feel for what flexibility I will have with seat weights and fuel load in the two tanks in order to stay legal (max weight no more than 390kg and centre of gravity within the prescribed min and max limits). So I’ve spent this evening creating an Excel spreadsheet that does all that for me. I’ve used it to check on the figures from last time and although I’ve made it primarily for my own use, it will in fact work for any 3-axis microlight – all that is needed is for an owner to ‘plug in’ the numbers from the relevant TADS/HADS for their aircraft into the red boxes in the spreadsheet, which is protected so no formulas etc can be changed or lost by mistake, and all the figures are updated automatically.

It’s very useful for older aircraft like the AX3 which have a low maximum weight and need to trade fuel for weight if, like me, you increase the tank capacity and need to know how much fuel you can add with any given passenger. Here’s a pic of the top of the sheet with the main boxes showing the variables already entered for an AX3 with twin tanks.

null

All I’ll need to do is add the new weights in each wheel box and the spreadsheet will reproduce all the calculations that the BMAA need on their report, such as with min cabin weight (55kg) and no fuel, min cabin weight and max fuel, max weight in 1 seat with nil and max fuel etc etc. At the same time the spreadsheet then compares the results of the calculations with the parameters from the HADS (max permitted weight and min/max C of G limits) and indicates whether they are ‘acceptable’ or ‘unacceptable’, telling you immediately whether you’re legal or not. There’s a ‘free’ calculation section at the end of the spreadsheet which is especially useful when you are planning a real flight with a passenger to let you calculate the amount of fuel that it is legal for you to load and here is a pic of that.

null

And finally, here’s a shot of the bottom of the spreadsheet with the old weight figures plugged in for me flying MYRO with a 10 stone passenger that shows I could load full fuel (both tanks full) and still be legal. It also shows the figures for a couple of the other ‘standard’ calculations, both of which have ‘unacceptable’ results

null

In case anyone would like to have the spreadsheet to either use or just play with, you can download it by clicking on the following link.

DOWNLOAD SPREADSHEET

If you do try it out let me know how you get on.

Mission accomplished!

It was another lovely soft late Autumn day today and by the look of the pink clouds while the sun was going down as I was walking back earlier with the dog, the shepherds around here must be highly delighted. Knowing that I was on the very last lap and with the weather being so gorgeous, it was an absolute pleasure working on MYRO today. I decided that as there was so little of it to do, I might as well take some of the red paint I used for the pod and touch in the two or three small chips that were now on the pod leaving time for the paint to dry while I was doing other work. After I’d done it, anyone who didn’t know where they were wouldn’t be able to find them now without a good search, so that was good.

Then all I had to do was re-do the ties between the pod and the rear fuselage cover. That was a bit more involved than it sounds because firstly there’s a gap at the back of the pod where things can drop out if they fall onto the pod floor (I lost a retractable chinagraph pencil that way when I was training with Rosie and I’m not sure you can get hold of them any more) and secondly, I had to deal with a bulge in the cover caused by the rubber tubing on the outlet of the second tank. I took a couple of pieces of polycarbonate sheet with me and the gap I dealt with as before by cutting a half-ellipse of plastic that I secured with the cable ties to cover it. I then cut an ellipse of plastic to go under the second tank’s outlet to spread the load across a wider area of the cover. I secured it by one small cable tie onto the tube and wedged a piece of foam rubber under it too. Afterwards there was still a small bulge but nothing like as big as it was previously. Another hour or so and all of the pod cable ties were in and the work on MYRO was finished. It was a terrific feeling to know that I’d at last arrived at the top of the mountain after working all the months that I have done, and the best feeling of all was knowing that as well as achieving the main objective of getting MYRO back into the air, I’ve also made it better than it was before. That was important to me because at least I know that some good has come out of the disaster that occurred back in May.

Before I can fly MYRO out I have to get it inspected of course, but I also need to get an hour or so’s ground running and power checks in so I can have confidence that I won’t lose the engine on take off. So I wheeled MYRO out into the sheep field again and here are some of the pics I shot before I started and after I’d taken a short break to loosen the font suspension bolts off a little bit.

null

null

null

null

null

It would be great if I could get Chris across to do the inspection during the coming week so I’ll have to play it a bit by ear. I’m busy on the afternoons of Tuesday and Wednesday so I’ll have to watch the weather forecast for later on in the week and also see how Chris is fixed. Who knows, with a bit of luck I’ll be able to fly MYRO over to Stoke for its check flight next week-end and it could be permitted the week after. Now that’s something I really am looking forward to 😀

Penultimate or what?

After a very successful day today, I should be completely finished tomorrow and MYRO will be ready for permit inspection. We had the first frost of Autumn last night because we’re heading into high pressure and the skies were completely clear, as they were this morning. The frost soon melted in the morning sun and we had glorious sunshine all day today. And it was surprisingly warm too – I was still able to work on MYRO in just a tee shirt.

Fist up I re-did the steering arms and they came up perfect, just as I wanted them to. They are now at least as good as the ones I got off G-MYME when I acquired the engine and stuff so as far as the books are concerned, they are the ones that are now fitted. In fact I think mine are probably stronger after seeing how the track rod end on one of MYME’s arms snapped when I was trying to remove it. I can’t see that happening with mine as I’ve used 316 stainless steel – so no corrosion either.

The next job was to look into MYRO’s starting problem. Whereas MYRO used to start on the button, last week it took quite a while to get the engine to fire up. I noticed that there was  something weird about the choke cable – every time I applied the choke, when I released the lever, there was more ‘spare’ cable than there was before. I suspected that there was a fault in the ‘1 into 2’ cable assembly and the choke wasn’t being fully applied and my suspicions were confirmed when I had a closer look and found internal damage. This could have been a bit of a disaster but fortunately I had a spare. The one I was using was MYRO’s original cable that Rosie had left on and I also got another with MYME’s engine. The reason I hadn’t used that one was because the cables were white and MYRO’s originals were black, but now was not the time to worry about that. Suffice to say that after I’d shortened it to match the old one and adapted it to use MYRO’s lever, when I used it for the first time MYRO started immediately. That was a result!

The last job I had time to do today was to refit the top and bottom covers between the wings. The velcro is a bit tired now after all these years especially towards the wing trailing edge end. I found that by roughing it up a bit, its effectiveness improved quite considerably, so after I’d fitted the mandatory cable ties connecting it to the wing trailing edge plus another couple, I ended up with a better job than  I had originally. So another reason to be pleased. So that just leaves the ties to be re-done between the fuselage rear cover and the back edge of the pod. I’ll buy some more cable ties tomorrow morning and it then shouldn’t take long to do the job. And that’ll be MYRO all finished and ready for permitting. There will always be the odd job – for example, I doubt I’ll have time tomorrow to touch in the little chips and scratches that have occurred during the work – but they won’t delay the permit inspection which I’ll then be able to go ahead and arrange with Chris. And thank goodness for that – about time 😀

Just to conclude this post, all of my original videos were done using Windows Moviemaker, and pretty good I found it too. However, earlier this year I treated myself to Corel VideoStudio Pro X4 and I’ve used that for my more recent ones, although for obvious reasons, I’ve had less opportunity to use it than I thought would be the case when I bought it! Funnily enough, I think that Moviemaker has better scene transitions and title effects as ‘standard’ than many of the paid-for packages, including VSP X4 I might add, but the Corel software has quite a lot going for it, not least that I found that by purchasing it via download, it only cost me $40 or so compared to something like £90 when you purchase it from Corel’s UK online shop! I also find that the quality of the finished video is better using VSP X4 than Moviemaker, so when I’ve had time, I’ve been going back and re-making some of my earlier material. I’ve just finished the video of my landing on Stoke runway 06 which was quite murky originally because although it was a bright day, it was very, very hazy. The result is now up in the Video Gallery and you can also see it by clicking on the picture below.

null

Yesss!

We had rain overnight and Sunday morning was a bit gloomy and damp. I was a bit worried that the weather might stop me doing what I wanted to on MYRO but by the time I’d had breakfast and taken the dog for his morning walk, it had brightened up considerably. I got myself together as quickly as I could and drove over to Ken’s. My first job was to give the sheep some water – whenever I arrive their trough seems to be almost empty and now they seem to associate me with getting it filled up. So when I stop my car next to it and start the hose running, several come ambling over and wait for me to finish before quenching their thirst. I don’t believe people who say that sheep are stupid animals. There are one or two in the flock that were hand-reared as lambs and a couple like to come to the fence and have their heads scratched, so I guess that’s them.

I got busy straight away on my new-new list of jobs aimed at getting MYRO ready to taxy. The main job, of course, was getting the ailerons back on and that was accomplished during the afternoon by which time Peter had dropped in. After finishing off a few bits and pieces, some of which I’ll have to re-do to tidy them up, the big moment came to wheel MYRO into the field and try a few taxy and power checks. Click on the pic below to see a short video of how things went.

null

I was really pleased with the results – there’s certainly loads of take off power without fiddling with the prop pitch so I’ll leave that as it is. Before I went, I cleared out some dried mud that had got between the rims and tyres on the main wheels during the accident and pumped the tyres up to the correct pressures. I also cleaned the plugs because starting, which was so quick and easy before, is now a problem. I might have to remove the carbs, strip and re-set them again as they have been left ‘standing’ for over 5 months since the accident – how time flies – and have probably become a bit garmed up with deposits inside. I may be able to have MYRO inspected anyway beforehand but I’ll play things a bit by ear as I need to go back and tidy a few things up before that. But for the time being I’m so pleased to see the light at the end of the tunnel now approaching. MYRO has taken over my life since I took on the repair work after the accident and it’ll be good to get back to some kind of ‘normality’ again – whatever that is 😕

Very nearly there

Made some good progress today, although the day didn’t start too well really. The remaining items that I needed arrived early in the post but then when I left to go to Ken’s, although I thought I’d picked up everything I’d need, I hadn’t. I thought I’d left the steering arm bits in my car but actually they were in my conservatory. As was MYRO’s starter key, so although I started on the new steering arms when I got to Ken’s, I soon had to return home again. I went straight back after lunch and finished the steering arms off and here are a couple of shots of them.

null

null

I’m pleased with how they’ve turned out but I’ll just use them to put MYRO through permit and then slightly modify them. The reason is that I’ve used M6 threaded stainless rod which I’ve enclosed in a stainless outer. The outer is made from 10mm OD tube with 1.5mm wall thickness. That gives an inner diameter of 7mm which I thought I’d need to take the 6mm dia rod. But it turns out I was wrong – the 6mm rod will fit inside 8mm tube with 1mm wall thickness without being too tight, so that’s what I’ll change the outer to when everything else has been sorted.

The other thing is that I eventually sorted out my starting problem without having to resort to dropping the panel. The clue today was that when I arrived and tried the starter, the engine kicked. That led me to believe that the circuitry is OK and when I was able to rig up my meter, I found that current was getting up to the starter solenoid when the key was turned. My initial thought was that the starter solenoid had failed but I couldn’t see why it should have after all this time. So I then had the idea of clamping a jump lead to the solenoid and the other end to the battery negative and sure enough, that did it. So the answer all along was that although the bolts holding the rectifier and solenoid to the main tube were a good enough earth before, now they aren’t, so all I had to do was make up a short earth lead which I clamped to the rectifier and battery earth terminal.

With that, although there was a lot of coughing and spluttering, probably because of the oil that had been put into the engine when it was checked, in an amazingly short time really, the engine started and was running sweetly. My new Ivo prop came off a Sluka and in theory, the pitch it should have been set to should have allowed MYRO’s engine to over-rev on the ground. But in fact it only revved to just over 6000 RPM with brakes on (that’s assuming the rev counter is accurate) so I’ll have to see what the power is like with the current pitch setting when I can do some ground runs.

There’s only one little niggle – one of the CHT gauges isn’t now working whereas it had been before. Unfortunately it was shaken a bit when I tapped the panel clips in so the gauge itself may now be damaged. I’ll find out when I get a chance to switch the wiring over between the senders – maybe tomorrow. So I probably won’t be spared my groping up behind the panel after all – but at least the CHT gauge is more accessible than the starter switch would have been 😕

Hmmm…. have to wait and see

Most of the stuff I need for this coming week-end has arrived today. I received a length of M6 threaded stainless rod, packs of 100 M6 nylock and plain nuts and a 100 M6 washers from Toolstation just two days after ordering them. I’ve used Toolstation quite a bit just lately and find them excellent, both on line and face to face. They are cheaper than Screwfix on just about everything and invariably have stock in their depots when Screwfix haven’t and expect you to order and wait for it to be delivered. Screwfix, why do you think people visit your depots rather than order on line…..? I’ve also received the four rose joints I ordered from McGill Motorsports just a day or so after ordering them on Ebay, although they have their own web site. That again is what I call excellent service, and the items are second to none in quality at an excellent price. Here are the two links.

Toolstation

McGill Motorsports

Now all I need is the length of stainless tube and the panel clips I ordered from Ebay at the same time as I ordered the rose joints. I’ll have to wait and see if they arrive tomorrow because without the tube I can’t fabricate the steering arms even though I’ve got all the other items I need and without the studs I can’t really drop the panel to get at the starter wiring. So now you see how the ‘weak links’ can have a knock on and prevent you doing what you want to do 😐

I’ll also have to watch the weather. Last week-end we had record-breaking temperatures and in a few days we’ve gone to bitterly cold northerly winds (this morning) and scatterings of showers. So I’ll also have to see how kind the weather is going to be to me… this is what I was trying to avoid 😕

Just like last time

Now that all of the main work on MYRO has been completed I seem to be running into annoying little problems one after the other, just the same as last time, that will end up delaying everything. The weather has really changed since last week-end and early this afternoon there were a couple of tremendous gusts of wind (probably just like the one that caused the accident…) that came out of nowhere and really rattled the conservatory roof. As rain is forecast for this evening, I thought I’d better make a quick visit to Ken’s, re-fit the starter motor and check out MYRO’s battery before tying it down and putting its rear fuselage outdoor cover on. I can’t fit the wing covers because without the ailerons being on they will be too big and might cause damage by flapping in the wind.

The bad news is that MYRO’s battery is fine (funny to be saying that a good battery is bad news isn’t it 😐 ) and that I will definitely have to get under the panel and check the starter wiring. I ordered some panel clips this evening to replace the existing ones that have been in and out now so many times that they are getting very tired and I just hope they are the right size. The idea will be to drop the panel front down if I can to give more access which should make the job a bit easier.

Then I decided to see if I could fit the steering arms. I found previously that one of the rose joints in the longer of the ex-MYME arms was a bit corroded in – there always has to be one, it’s always the same old story. I couldn’t get it out before so I loosely fitted it on MYRO and thought it might give me a better grip. It did all right – so good that the thread on the rose joint snapped leaving the broken stub still in the stem of the arm. Well, that made my mind up for me. I’m sick of keep messing about with old bits like this so this evening I bought the materials to fabricate my own high quality stainless steel steering arms. I didn’t even bother calling P & M because based on recent experience, I doubt they’d have any in stock and would end up fabricating some themselves at huge cost. I’ll just put mine through inspection and say now’t and I’m sure they will be OK 😉

So I left Ken’s miffed as usual, as has been the case every time recently. I’m getting very frustrated and annoyed with these almost trivial things that are now causing such delays. I fitted the outdoor covers and tied MYRO down even though it is in a fairly sheltered position which was a good thing by the sound of the wind outside now as I type this in the evening. I took a few pictures as I left and I just took a look at them. Yes, you’ve guessed it, they’re all out of focus for some reason – maybe my little Pentax camera is going on the blink as well now 😕

Here are a couple anyway after I’d sharpened them as much as I could with Photoshop.

null

null

Good news and bad news

Although not forecast, there was a sprinkling of light drizzle this morning, so I thought I’d make a quick visit to Ken’s to check on a few things and put a cover over the gap between MYRO’s wings. The first thing I did, of course, was check the electrics against my original reference photographs and my wiring diagram. I couldn’t see anything wrong so because I’d had to re-make a connection in the wire between the starter switch and starter solenoid, I thought I might as well do it again in case the new join was bad. After I’d done it, I turned the key and the starter kicked, so that was good. However, the prop cover was still on and after I’d removed it and tried again, the system was dead as before.

The obvious thought was that the battery was dead but with a small quantity of fuel in the tanks (I had been hoping to start the engine), the fuel pump appeared to be running at full speed. I then checked the starter motor by making a direct connection to the battery and it appeared to be dead, so I ended up removing it and bringing it home so I can test it on a battery here. I’m hoping in a way that it is MYRO’s battery that’s the problem because otherwise I’ll end up having to test all the connections under the panel. Without being negative, it always seems that whenever there’s a problem, I think of the worst-case scenario and that’s what it turns out to be, so I’m not over-optimistic about it, but whatever the problem is, I cannot now see me being all finished this coming week-end. I can see at least a week’s delay looming here.

I then spent a half hour or so getting some tension in the wing coverings and tightening the straps as much as I could. The result wasn’t bad and I put MYRO’s centre wing cover on just for now so there’s no open gap, followed by the outdoor top cover that I made. That’ll keep any rain off if we do get some, which I think we might tomorrow at least.

The last thing I did was check the steering rods. MYRO’s original ones were destroyed in the accident and I stripped all the usable bits off them yesterday. When I got my engine off MYME, I also bought the steering arms which were in superb condition but found them to be too long for MYRO. I’d hoped to be able to reduce them in length but found yesterday that they cannot be cut down but only adjusted slightly at each end. Even so, they couldn’t be made as short as MYRO’s originals, so I was resigned to using the ones I got with the new forks which were not very pretty and a bit rusty as well. I took both sets with me today to make sure that the latter were the right length before refurbing them only to find that they are too short! The good news though is that the newer ‘long’ ones off MYME look to be the right length, although for the life of me I can’t understand how, as they weren’t before. Quite honestly, I can’t be bothered thinking about it given the electrics problem. I’ll just go ahead and fit them next time and be thankful 😉

By the way – since typing the above, I’ve tested the starter motor on a car battery and it’s working fine, so maybe because I couldn’t make it work earlier with a direct connection to it, the problem is with MYRO’s battery. Possibly it didn’t like the charger I’ve been using since the accident to keep it topped up and it’s been ‘fried’. Of all the possibilities, I hope so and I’m keeping my fingers crossed because I really can’t face the prospect of tracing circuits under MYRO’s panel… 😐

Almost but not quite

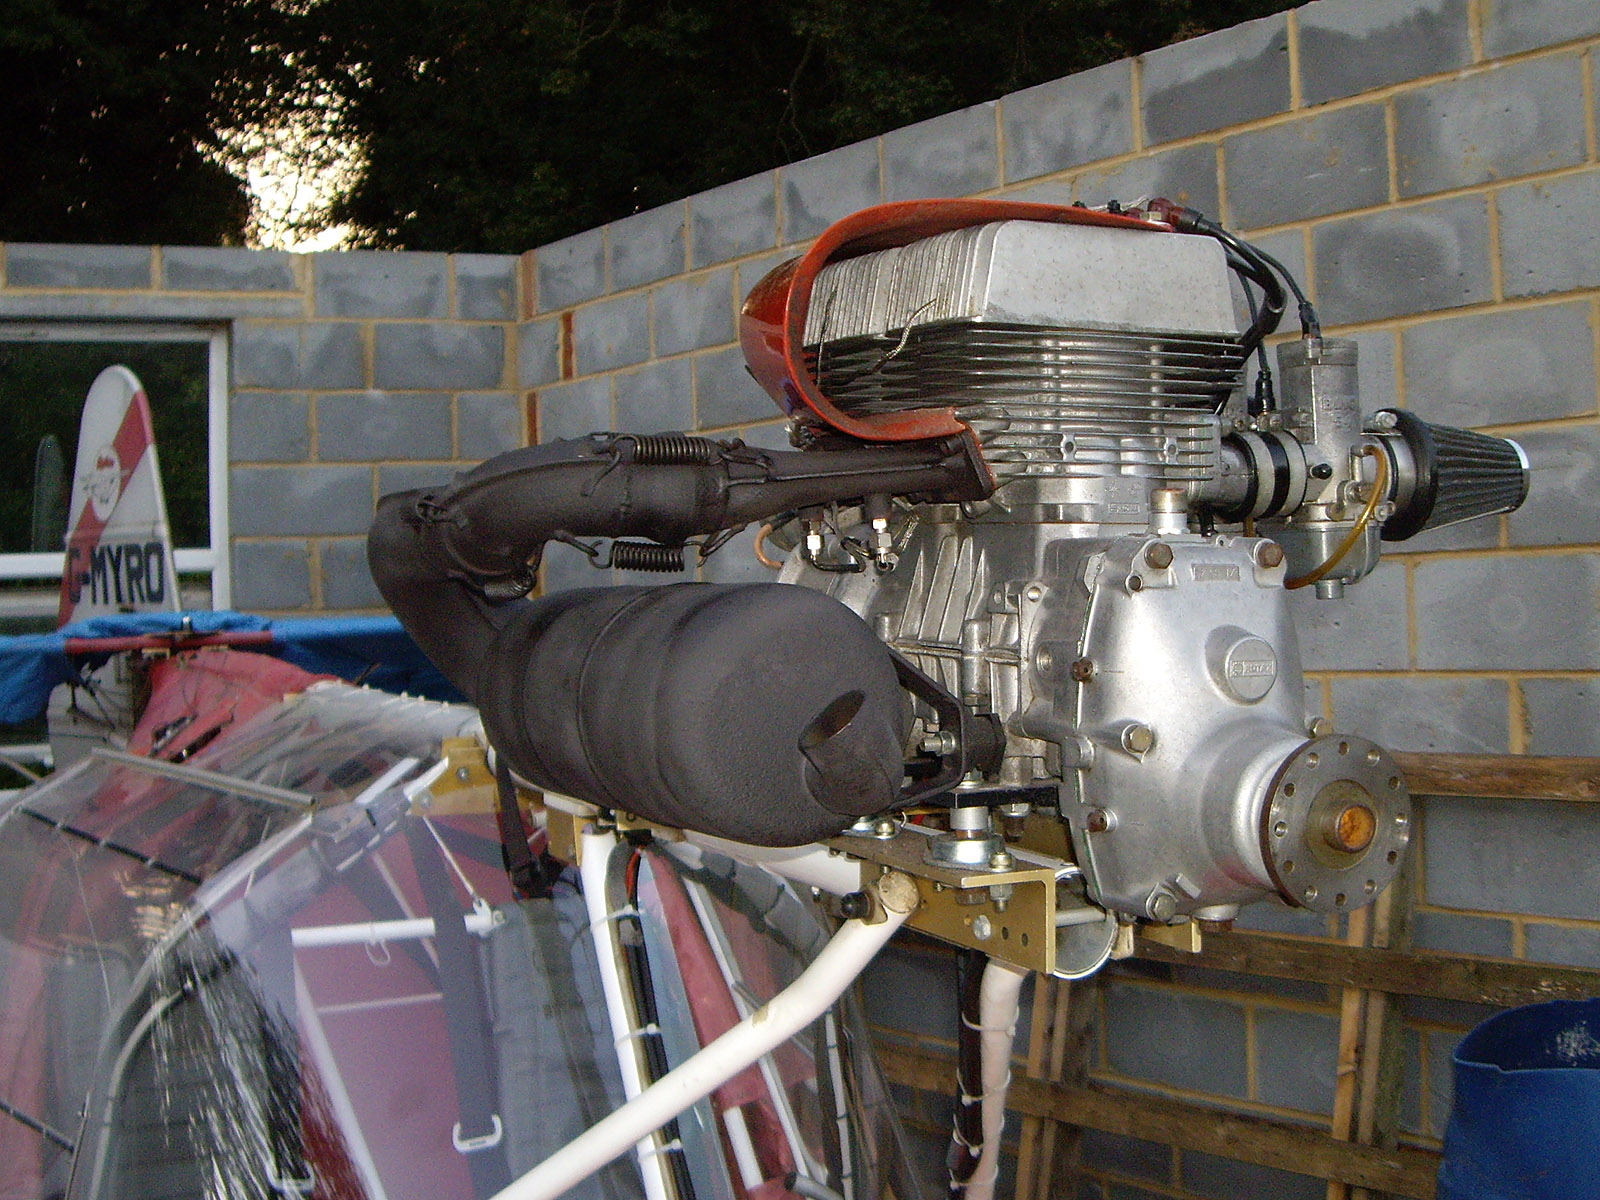
I was so glad that I tackled the engine fettling and exhaust work yesterday because I started today with such a long list of niggly little jobs that needed doing before I could get on to re-fitting MYRO’s wings that if I’d had those two extra largish jobs on the list as well, it would have made it very difficult to make the progress today that I did. As it was, there was one setback which I’ll come onto later which I hope will not take too long to resolve.

So the day began with lots of cable tying and tidying things up, stuff like that. I also had to add oil to the gearbox and wire lock the gearbox plugs and exhaust springs before turning my attention to the prop. The propeller I got hold of is a 3-blade Ivo Prop and it only took me half an hour or so to attach it to the prop flange and torque the 6 fixing bolts up to 200 in/lb. I don’t like the centre nut as much as I did the hub on the now-gone Arplast but I think I prefer the black of the Ivo to the grey of the Arplast. I think it just goes better with MYRO’s general colour scheme and looks a bit more striking. Here are a couple of pics to show what I mean.

null

null

Then on to the battery. It’s easier to fit the battery with the wings off because to make it nice and secure, you need to use some large cable ties to hold it on and give them a really good tug. It all went very smoothly and ended up as a nice neat job. So with bated breath I reached into the cabin and flicked on the master switch and was pleased to see the master neon start glowing brightly. Then the fuel pump – same again and it burst into life for a second or so until I turned it off almost immediately as it would have been running dry. Then the big one. I turned the ignition key past the left and right mag positions to activate the starter and …. nothing. Dead as a doornail 😐

This is what I was worried about because when I removed MYRO’s panel and wiring loom, even though I was extremely careful, a couple of wires close to the rectifier end detached. I thought I’d re-attached them correctly but it seems possibly not. When I was working in my garage, it was a simple matter to go indoors and check wires and connections on the many reference photographs I’ve taken whenever I’ve done any kind of work on MYRO, but I can’t do that working over at Ken’s. So I’m resigned to having to get my wiring diagram out and physically check where the error is and I just hope that I don’t end up upside down in the cabin with my head under MYRO’s panel tracing circuits. I’ve just about had enough of that kind of thing 😕

I then sorted out the wing struts ready for re-fitting the wings and shortly after, Peter arrived. He and Ken gave me a hand and having done the job before and knowing what to look out for, pretty soon MYRO had its wings back on for the first time since the accident happened in May. It was a sight that gave me enormous pleasure and even though only the main struts were fitted at the time, here are a couple of pics to mark the event.

null

null

Some time ago, Ken and I had been thinking ahead to the day when I fly MYRO out for its check flight. The field I’ll be using which you can see in many of the pics suffers from good old Kentish flints that seem to rise to the surface over time and either remain embedded with sharp edges pointing upwards or even come right out and lie there fully exposed. They can’t be left and as it was late afternoon by now and there was a bit of a crowd present, we thought we’d have a group flint picking-up session. It was very effective and in an hour and a half or so, we cleared a good runway’s length. The others then all had to go and before leaving I thought I’d attach MYRO’s wing jury struts to more or less finish the job off. By the time I’d finished, it was getting quite late and a bit dark and here are two final shots, taken after I’d moved MYRO into the centre of the concrete standing before leaving. As I had them in the car already, you can see that I’d put the seat cushions and head rests in the cabin as there’s no more work to do in there (unless I have to start tracing circuits, as I mentioned previously).

null

null

So that was it. It was great to see MYRO back looking like a proper aircraft again and a pity that I’d had the setback with the electrics for the starter. Hopefully I’ll be able to sort that out pretty quickly and with luck, it won’t be too long now before I’ll be calling Chris up to come and do the permit inspection. Let’s hope so, anyway.

Another very long, hard day…

But MYRO’s repair work is now more or less all over bar the shouting! The main job today was to get the fuselage rear cover back on, so that’s what I started with. It turned out to be an incredibly tricky and time-consuming job because I didn’t know how to approach it and it took several false starts and several metres of wasted nylon cord before I got it about right. But although it took me most of the day, I got there in the end and was happy with the way the job turned out. The cover ended up nice and taught without being over-tight and parts of it in the cabin door openings ended up better than they were to begin with.

Today turned out to be a new record for the highest recorded temperature in October at 29.9C (85.8F) in Gravesend – which, of course, is more or less where I am doing the work on MYRO! The day was very reminiscent of when I was putting the finishing touches to MYRO last time, except that was in July on the open airfield at Linton where I ended up getting a touch of sunstroke. This time it was a bit better though, because I had some shade to retreat into and during the afternoon the sun went behind a wall of the unfinished building in which I’m working. Even so, I made sure I took a large flask of iced orange squash with me, and I’m glad I did 🙂

After finishing the rear cover I also re-attached the rudder cables and was going to leave it there because by then I was very hot and tired. But I figured that if I could do the fettling and clean up of the engine that I wanted to do and also repaint the exhaust with heat resistant paint, then I’d only have a few odd jobs left to do tomorrow and once the wings were on, I might even be able to do some taxying and ground runs. So I decided to press on and although it was early evening, but still glorious, by the time I’d finished, I got the engine and exhaust work completed and even got the engine cowl re-fitted too. Here are the end-of-day pics.

null

null

null

null

null

null

So I arrived home tired but very happy with how the day had gone and I can’t wait now to see exactly what tomorrow might bring 😉