Do gremlins really exist?

No doubt about it. Three immediate examples from what I’m doing right now. I have already lost two possible windows for flying to the UK due to delays receiving items and materials for my Savannah’s new instrument panel. Actually getting my new radio and transponder delivered was the main problem that set me back by more than a week but once they arrived it should all have been a downhill run.

Has it been? Hardly. I have everything ready now to fit into the new panel. Only one problem. My order for the aluminium from which to make the panel never arrived and after I told the French supplier to get lost they gave me a refund with no argument. But as a result, a further two weeks lost and I’m now awaiting replacement material from Germany, which is en route.

As mentioned in my last posting, I want to incorporate a small microelectronic device to better regulate my Hobbs gauge that records engine hours. I have had nearly all of the components to hand to construct the device for several days except for what’s in a package ordered from a UK supplier. A follow-up order placed on that supplier has already arrived but my initial order seems to have gone missing. And naturally that’s the one that contains the circuit board without which I can do absolutely nothing.

Last one, which is just aggravating but not serious. I’m not happy with my panel labels and rather than buy another pre-printed sheet, it was cheaper actually to buy a proper little Brother electric label maker so I can make my own. As well as the white on black tape sample that it comes with (which is too wide for what I want) I ordered a narrower reel of white on black. I decided that the labels are not quite what I’m after so thought I’d go for black on white and ordered 1 reel of 3.5mm tape and a couple of 6mm, which I think is what I’ll be going with.

The 3.5mm, which was delivered today, is too narrow as I expected it would be and I wondered where the 6mm reels were that I ordered at the same time. Amazon tracking says that they were delivered yesterday. Huh? They weren’t, so they’ve obviously gone AWOL. In 5 minutes or less, Amazon have agreed to an instant refund so I’ll just reorder them but, as I say, aggravating.

Do gremlins ever go on holiday? I wish the one looking over my shoulder would give it a break for a while because at this rate I’ll even miss my third window for flying to the UK at the back-end of May and that I do not want to happen.

Time to tackle the tacho

Or to nobble the Hobbs. I’ll explain. Almost every aircraft, including most ultralights and ULMs, have a gauge or metre on their instrument panel for recording and displaying time. It’s widely referred to as a Hobbs gauge.

null

But as in many things to do with aviation, measuring time isn’t as simple as it might seem. The reason is that there are several ways in which time is significant, the most important ones being engine and airframe time and in particular the time schedules between maintenance tasks and overhauls and the ‘life’ left in components and the airframe itself.

The first one is ‘switch on to switch off’. This refers to when the master key switch is turned on to the time it’s turned off and the aircraft’s Hobbs meter that displays hours would be connected directly to the master switch in order to show it. But it’s clearly not a very relevant measure. Just because you’ve turned the power on it doesn’t mean that anything is being used, consumed or subject to wear.

If a pilot needs to switch the cabin light on to read his navigation notes there’s no reason why time should be removed from the life of the engine or airframe while he does so. Similarly, if an engineer is installing or testing the strobe light system and needs an hour or so of electrical power for that, it has no effect on engine life and there’s no reason therefore, why it should be logged.

The next time measurement is ‘engine on to engine off’.Clearly this is much more relevant to engine life and worthy of being recorded but even so, it may not represent the whole story as I’ll go on to discuss below.

Then there’s ‘brakes on to brakes off’ and ‘wheels up to wheels down’, both measures which are relevant to flight time and ‘cycles’. Most general aviation pilots use the former for logging their flight time as it covers the total period during which they have taken control of the aircraft.

Some argue that ‘engine on to engine off’ is more relevant as that’s the period for which they’re in charge as captain of the aircraft during which they are technically flying. My own view is that that overstates flying time as I disagree that sitting on the apron warming up the engine for ten minutes prior to the flight is actually ‘flying’ even though technically you do ‘have control’ of the aircraft.

For many commercial pilots, especially those flying large passenger jets, ‘wheels up to wheels down’ has to be recorded as a measure of airframe ‘flight cycles’ but it’s not something that’s particularly relevant for general aviation pilots and especially private pilots of light aircraft.

But let’s look again at ‘engine on to engine off’. There has been much discussion over the years about this measure of time that continues on the aviation forums to this day. There are many who argue that it should be strictly applied when considering maintenance schedules and engine life as engines incur ‘a high level of stress and wear’ when being started from cold just as they do when cruising at higher revs while in flight.

I personally disagree with this. Today’s engine oils are specifically engineered not to drain from bearing surfaces, pistons and cylinder walls as they did in the past. Modern lubrication technology sees to that. So to argue that engines incur a high level of stress at start-up is, I believe, over-stating the case somewhat.

And I think that’s it’s also wrong to equate the ten minutes or so that a modern engine ticks over at low revs while warming up with a similar period during flight at cruise engine revs. So what’s the answer?

It seems to me that what is necessary is some compromise means of measuring time that is based on engine use but takes account of when an engine is running slowly and not subject to the stresses involved in climbing or working at cruise revs and luckily there is already something in existence that provides an engineering based solution.

This is the so-called ‘tacho reading’ or tacho time. Tachos, short for tachometer, are time recorders that are built into an engine’s rev counter and are designed to take into account engine revs. Tacho time is similar to Hobbs time but instead of measuring actual hours that the engine is running it measures engine RPMs. This means that the tacho time cycles through the numbers more slowly at idle and low throttle settings, and faster at higher power settings.

Tacho time varies according to aircraft type and is calculated based on the average cruise RPM of the aircraft in question. So in many ways, this represents the ideal way to measure time when considering maintenance schedules and engine life and in most situations in general aviation it is used for precisely that purpose.

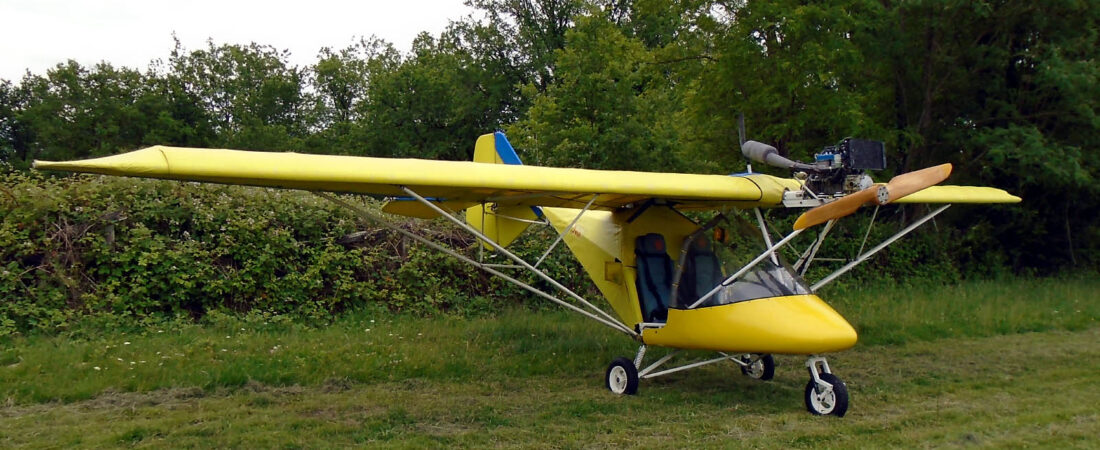
But there is only one problem. Tachos are found in all normal general aviation aircraft from light singles upwards but are not usually found in ultralight aircraft and ULMs like my Savannah which usually have to use much cruder methods of measurement, especially in the form that they come ‘straight from the factory’.

So what is my concern in all of this, you may ask? As hinted above, my Savannah does not have a tacho. In fact it has the worst of all worlds, a Hobbs gauge that’s linked to the master switch that has caught me out on more than one occasion when I’ve left it on and had hours ticking up even though the engine was not switched on.

And to make things even worse, I have been keeping a strict record of tacho v flying hours and have found that my Hobbs gauge is slightly over-reading, so I’m losing out all round as the only ‘log’ that came to me with the Savannah was an Excel spreadsheet that records only the Hobbs time.

This means that if I left things as they are, not only would I be carrying out servicing at unnecessarily frequent intervals but I’d also be losing out on the value of my aircraft when I eventually come to sell it through understating the hours left on its engine. This could be by as much as 15%, so not an insignificant figure.

So what might be the solution? My original aim was to modify the Hobbs gauge circuitry so that at the very most it only began recording when the engine was started. As mentioned previously, this can be accomplished quite simply by introducing a diode into the circuitry that only switches on when the alternator starts to generate a current.

Although more acceptable than what I have at present, I did not see this as being the optimum solution however, because the Savannah’s 912 engine has to warm up at idle revs for around ten minutes before each flight and as I said before, I do not think that this should be counted against logged time. I therefore raised a question on the microlight forum and was intrigued when Sean in the UK posted a reply.

Sean came at the problem from a different direction but essentially his objectives were similar to my own. He oversees a small fleet of Ikarus C42 microlights which are frequently hired by his club members for their own use. He has to charge by the hour but needs a form of time measurement that is not only realistic given the need to maintain the aircraft correctly in accordance with published maintenance schedules but is also fair to the members.

And he also has another concern. Because members wish to keep their hire charges to a minimum, there is a great incentive for them to minimise the time spent warming up the engine and to begin their detail as soon after starting the engine as possible. This would be good for them but ultimately terrible for the engines so Sean needed to find a way to deal with it effectively but in as fair a way as possible.

And he came up with a very elegant solution in the form of a small microprocessor controlled module that powers the Hobbs meter via a signal received from the rev counter. Ideally he would probably have liked to base his charges on tacho hours, but as microlights don’t come with tachos, his method apart from being very elegant, is clearly the next best thing.

null

The concept of Sean’s circuitry is relatively simple. Each aircraft’s Hobbs gauge is connected pemanently to its 12V positive electrical supply but its earth is connected and disconnected by the module. The module receives a signal from the aircraft’s rev counter and is programmed not to connect the Hobbs’s earth until a specified rev figure is attained, in his case 3200 RPM.

So after an aircraft’s engine has been started, its Hobbs gauge does not run while the engine is warming up at low revs and only starts to register when it starts to taxy. The Hobbs then continues running continuously thereafter until the engine is slowed to a specified low revs figure, in Sean’s case 500 RPM, so the members are happy as they are not charged while the engines are idling warming up and Sean’s happy because the engines are not being subjected to poor practices.

Originally I would have been content going for just the simple ‘diode in the charging circuit’ route so my Savannah’s Hobbs gauge only registered while its engine was running. However, I was so intrigued and impressed by Sean’s solution that I decided to take that route instead and over the past week or so have been busy solving the intellectual puzzle of how to convert Sean’s circuit diagram into an actual layout that I can create on copper strip circuit board.

null

I think that I’ve succeeded but will have to check and check again to avoid any mishaps before I begin actual soldering work. I’ve already begun receiving the components that I need, which are not expensive, including the little Arduino Pro Mini microprocessor that’s at the heart of the module. I amended Sean’s code for my Hobbs to start recording at 3200 RPM and to stop at 1600 and uploaded it into the processor today.

The trick will be to program the module with figures that emulate a GA aircraft’s tacho output. From my experience when I was a member of a Piper Cherokee group that charged for time using tacho hours, this was somewhere around 90% of flying time, so that will be my target. I’m now looking forward not only to completing the Savannah’s panel upgrade with its new avionics but also incorporating this neat little module into its Hobbs gauge cicuitry and I’ll let you know how I get on 😉

Waiting, waiting…

From my experience, you do a lot of that in France, most especially when you are waiting for something that you’ve ordered to be delivered.

I’m delighted to say that my soopa-doopa new radio and transponder arrived yesterday, so apart from having to send off a cheque for 98€ for the transponder antenna cable and wiring loom plugs that they included but forgot to add to the invoice when they initially provided me with payment details, that saga is thankfully over.

null

But even with all of the delay involved in actually getting hold of this kit, incredibly I still do not have a panel to put it in despite this notionally being, apart from the detailed fabrication work involved, the simplest thing to arrange. I initially acquired a sheet of pre-lacquered aluminium, not the easiest thing to locate in the form that I wanted it, but which was delivered just a few days after I’d ordered it.

Unfortunately my original fabrication efforts were not up to standard and after using the sheet for learning and experimental purposes, I decided that I’d order a sheet of plain aluminium as a replacement which one would expect to be much more readily available. And sure enough, it was easy enough to find an internet supplier who boasted of having the material in stock and claiming to be a leading supplier of all metal types.

That was way back on 16th April. I was immediately informed by email that the order was ‘in course of preparation’ so proceeded to wait in eager anticipation of my small sheet of standard aluminium arriving on my doorstep within a few days just as the other more elaborate pre-lacquered sheet had done. But this was not to be the case.

In the meantime various other items and components that I ordered on the internet arrived just as I expected them to but still no aluminium. So I contacted the supplier and said that if they were unable to supply this simple item would they please cancel my order and provide me with a refund so I could source it elsewhere.

I have already discovered that there are three types of internet supplier here in France. The most successful ones behave like Amazon – they take your money, communicate with you effectively and deliver your goods on the promised date. Others, however, are very pleased to take your money but don’t much like the inconvenience of actually having to supply you with the goods you’ve ordered, do so grudgingly after considerable delay and never communicate with you often even after you’ve contacted them several times.

And the last type, the worst of all, like to take your money, fail to provide any product or service at all and still want to hang onto it. I found this to my cost when I employed the services of BSP Auto in Paris to arrange a hire car for me, did not use their service and cancelled according to their terms and conditions and then had to spend weeks getting my money back from them, which I only did after legal threats.

My aluminium supplier falls into the second category, I find. After contacting them they said that they take 8 working days to turn round an order – this to cut a small sheet of material and despatch it – and if as I said in my message it was ‘urgent’ I should have said so when I placed the order.

I find such complacency astonishing. Nobody orders something they don’t need and once they have placed an order and paid for it, they expect it to be delivered in a timely way. In this respect every order is ‘urgent’ and any business that fails to recognise this does not deserve to succeed. They told me that my order would be shipped out ‘the next day’ for delivery today.

As I type this, it is already late afternoon and I have received no notification from any delivery company that my order is on the way. Naturally, I will never use this supplier again, but it’s already too late and I’m about to lose yet another week-end that I could have spent fabricating and assembling my panel.

I have important family reasons for wishing to fly back to the UK in the near future but to do so I need to have my Savannah in a fit and airworthy state. So far some of the suppliers I have chosen to assist me in achieving this have done exactly the opposite and I hope that they don’t end up costing me more dearly than just money.

New carb rubbers needed?

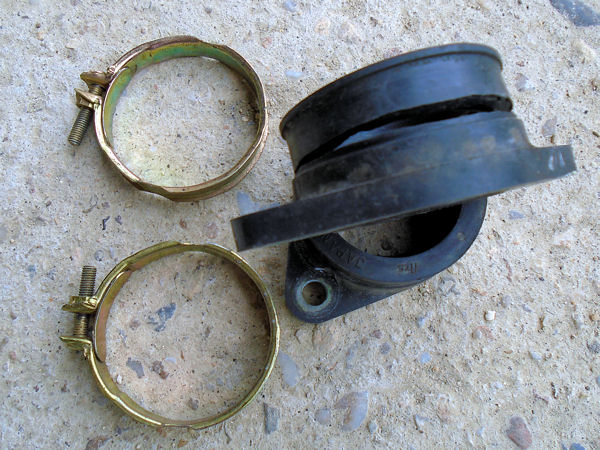
I’ll say so! The following picture says it all.

null

Replacing them both didn’t take too long to do – a couple of hours at most – but it was well worth doing. Both carb inlet rubbers seem to be exposed to the same sort of environment, at the back of the engine and above exhaust outlets. But for some reason, whereas the right hand rubber still looked almost new, the left hand one was completely shot. No wonder the engine was running rough. In fact it’s almost a wonder that it was running at all and am I glad that I switched it off so promptly when it began to shake.

I wonder if the last time there was a problem, it only affected the right hand rubber and someone just replaced that one, leaving the left hand one alone. If so, in my opinion it was a false economy because although these things are a bit pricey for what they are, it seems to me that they should be changed before they actually split, say every three years at most or every 300 hours, as Rotax recommend. That will be my policy in the future, although at my age who knows how many times I’ll get the chance to do so 😉
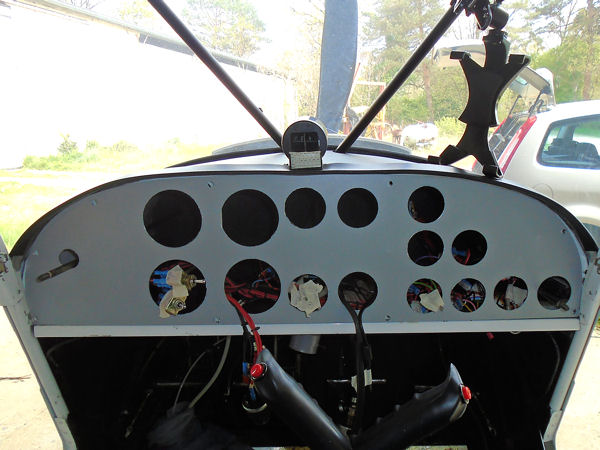
Although I won’t be using it, I took the panel that I’ve been working on to Malbec with me and put it into place to see how it will look.

null

I think that the layout works pretty well, but on this afternoon’s evidence, I think that I might need to move the central group of six gauges (two x 80mm, four x 57mm) slightly to the right to make sure that they clear the vertical panel supports. All I need now is for the new aluminium to arrive so I can get cracking on it.

Daddy, what’s a learning curve?

It’s what you climb up, my son, when you’re building a new Savannah instrument panel. Suffice to say that I won’t be using the panel that I’ve been working on – I can’t anyway because I drilled a large hole on the wrong side – but I’ve now learnt by my mistakes how to go about doing the next one and, hopefully, making a nice job of it.

I’ve already ordered another sheet, this time of plain aluminium instead of pre-lacquered, which I should receive in a few days time. The new sheet of 1.5mm aluminium will have a protective film on one bright side and I’ll decide when it arrives whether to leave it on or not before I start working on it.

Another thing that I’ve learned is that I must work from the front of the panel because both the drills and the cutters that I’ve been using give a clean cut on the entry face and any burring, if there is any, is left on the back where it can be removed without leaving any visible trace.

The next thing is that I’ve now managed to get clean, vertical cuts using my hole cutters. I’ve had to do several things to achieve this. Firstly, by just screwing my hole cutters onto the arber I’m using (the arber is the shaft on which the cutter is mounted that fits into the drill chuck) and not using the securing mechanism that it came with, the cutters are mounted much more securely and are rigid in use. It was mainly because the securing mechanism allowed them to wiggle a little from side to side that the holes they produced were coming out with slightly bevelled edges.

The other thing that caused the holes to be untidy was using a hand drill. I’ve now made up a temporary rig on my bench-mounted vertical drill that allows me to clamp the panel firmly in place for working on and the holes that result are vastly superior to what I was getting previously. In fact, the only holes that are critical are the three 80mm ones for the ASI, altimeter and VSI because all of those instruments are inserted from the back. I’m pretty certain now that if I take enough care I’ll be able to make good jobs of them using my bench rig.

All of the other holes in the panel are relatively much easier to cut and drill because the gauges and switches that go into them all have front bezels that will cover up any cosmetic discrepancies. The only other thing that I’ll have to do is make sure that I drill the holes accurately in their correct positions and I’ve learnt that the best way to do that is to centre-punch each one beforehand. This makes it much easier to line up the drill point before clamping the panel down on my rig.

So that should do it and I guess that taking my time so I don’t make any silly mistakes, I should get the panel finished with a couple of days of work. I received confirmation earlier this afternoon that my radio and transponder kit has all now been picked up by DHL so I’ll hopefully have that by the end of the week so with a bit of luck I could have the completed panel ready for refitting early next week.

As I then need to test everything and make sure that it all works as it should and get the transponder programmed and initialised (probably in La Rochelle), this will be too late for my first window to fly to the UK. I suspect that it may also be too late for my second window a week later but I’ll just have to do my best and see how things turn out.

Not a good day

Not entirely – it actually started off pretty well. I got an invoice this morning for my new radio and transponder that included a credit for the ATR833S radio that I returned a couple of weeks or so ago, so I did an immediate transfer of funds to the supplier’s bank account and now, although it hasn’t yet been confirmed, I assume that the kit is winging its way to me.

But from then on it all went downhill, as I’ll explain. Today was the day for starting on the new panel fabrication work, namely cutting it out and cutting the first few holes for the gauges. I don’t have all of the hole cutters that I need but at least I could do the 80mm and 57m diameter ones. Cutting the panel itself out of the 100cm x 25cm sheet that I ordered went well just using a jig saw with a fine blade but problems began when I started on the hole cutting.

Firstly, although I clamped the panel down, cutting the holes using a hand-held drill just isn’t good enough. It didn’t help that I omitted to centre-punch the centre of each gauge hole to make sure that the holes were exactly positioned and one of them is slightly out. Not by much but enough for me to notice. But in any case, the hole cutters always move sufficiently to make each hole oversize.

I’m also now thinking that it was a bad idea buying a pre-lacquered sheet. The reason is that the plastic film that protects the lacquered face melts when you are drilling and you end up with holes with messy edges. Until the job’s finished and I remove the plastic I won’t know how good or bad the holes actually are, but quite honestly, it’s not worth the extra expense and bother of working with a sheet of pre-painted aluminium.

Another consideration is that when you cut a hole, it ends up with bare metal inner edges. These won’t be seen if your holes are cut with enough precision for the gauges to fit tightly in them, but that’s not the case. So long as the extent to which they are oversize is not too great, if you then sprayed the panel yourself the edges would be covered making them far less noticeable but again, I’ll have to wait and see how the panel turns out in order to judge its appearance.

Here’s a shot of where I got to today.

null

All in all, I was very disappointed with today’s progress. I’ll press on now I’ve started but I have a sneaking suspicion that I’ll use this version as a learning tool and then buy another sheet of bare aluminium to see if I can do better. But it won’t be for a few days, because the other thing that happened is that I succeeded in burning out my old Black and Decker mains electric drill. And I’ve got a constant reminder because the smell was surprisingly intense and seems to have penetrated my clothes so I can’t get rid of it even hours afterwards.

I’ve ordered a modern, more powerful, replacement (the old one was only 500 watts) but as usual, it’ll be several days before it’s delivered. No point trying to buy it locally because of the time you lose trawling around the shops who always end up not having exactly what you want in stock even though they say they have, and then paying 20% more for it. Luckily, I’m expecting the Savannah’s new carb intake rubbers to arrive tomorrow, so the time waiting for the new drill won’t be wasted.

More Savannah instrument panel

Today I finished stripping out all of the surplus cabling that had been used for the old radio and intercom set up and identifying all of the connections that I’ll need for the new radio and transponder. As I suspected, although I didn’t come across any more bare connections, the wiring for the previous installation was shambolic and I look forward to making things much neater behind the panel before I’m finished.

One of the things that I found very bemusing was that the power cable feeding the radio had been wrapped around the main panel wiring loom in the form of a long coil. Now I’m no expert, but I think that that’s a no-no for any radio because the coil form has the potential to act as an antenna and introduce interference into the system, which is just what you don’t want. Anyway, I won’t be doing the same thing when I come to connect the new kit.

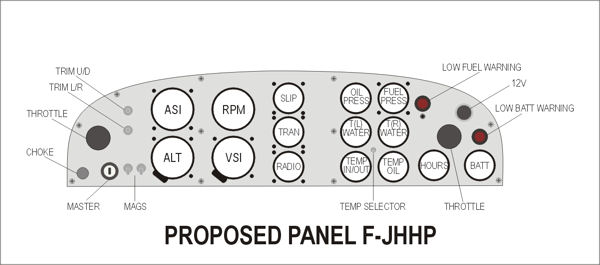
I also spent some time today thinking about the new panel’s layout and trying to come to a final design, which I think I now have done having had the old panel lying on my kitchen floor for several days and looking at it every time I walked past it. Unfortunately, I’ve had to come to the conclusion that the panel is just too small to incorporate a tablet to run my navigation software so that has had to be left off. The design I’ve finally come up with is as shown below.

null

The changes compared to the original layout are only slight and quite subtle in that I’ve changed very little on the right and left hand sides of the panel. The reason for not adding an extra gauge into the group on the right hand side is that the existing gauges are all 52mm in diameter and if I’d shifted the fuel pressure gauge over into that area it would have stood out like a sore thumb because it is a 57mm gauge and also has four fixing screws which the 52mm gauges don’t. I’ve not changed anything over on the left hand side, the pilot’s side, apart from swapping the 57mm rev counter for the new 80mm one because there isn’t really the potential on that side to do anything significant to gain space and certainly not enough for an extra gauge.

What I have done is change things in the centre of the panel. I’ve carefully measured the space available and I’m 99% certain that if I move the RPM and VSI gauges a little left of where they are in the current panel there will be enough space between them and the right hand vertical row of fixing holes to get in two columns of 57mm gauges. This means that I’ll be able to have a slip ball and the existing fuel pressure gauge on a top row and the new radio and transponder on the bottom.

There are a couple of advantages with this layout. First, by having the radio and transponder on the bottom row, the ‘D’ plugs of both units will be readily accessible. This will be especially useful for whoever programs and initialises the transponder for me because it will be possible to do the job and the subsequent testing ‘in situ’.

The other thing is that both the radio and the transponder require 3 amp in-line fuses and because there will be enough space vertically between the lower and upper rows of the 57mm gauges in the centre, I’ll be able to have 3 amp contact breakers in the panel as shown, above both the radio and the transponder. This will be much more convenient (and professional) than having in-line fuse holders that you’d have to reach up for behind the panel as was the case with the old radio that I’ve just removed.

I’ve ‘lost’ a week because I’ve not heard from my German supplier since last week-end, probably because he was at the show at Friedrichshafen all week that has just finished. I heard from him again today so I’m hoping that I’ll receive all the new kit by the end of this week. It’ll be too late for me to make my first window for flying to the UK (leaving 20th April) but I’m hoping that despite having to get everything fitted and installed and the transponder initialised and tested, I’ll make my next one leaving the following week-end. All I can do is press on and do my best 😉
More Sav panel and a piece of good fortune

I pressed on with stripping out the Savannah panel today and succeeded in getting everything removed save for one recalcitrant screw holding the small rev counter that I want to dispose of in the panel front. Everything else was out by the end of the afternoon and I lost just one gauge, an AVD temperature gauge with a plastic body that broke when a securing nut tightened up on one of its mounting bolts and wrenched the bolt out.

Unfortunately the gauge has now been discontinued and an initial search has revealed that the ones available on line all come complete with the temperature sensor at prices not far short of 200€. So that’s a big disappointment and I think that I’ll have to start by seeing if I can repair the gauge casing with Araldite or something similar, much as I don’t like the idea of doing that.

Here’s how the panel looked at the end of the day.

null

null

null

null

So what about the piece of good fortune? Well, I got the Savannah out of the hangar a few weeks ago for the first time since I last flew it in December in order to start it up and give the engine a run. I found that it took longer than usual to start and when it had done, it seemed to be running a bit rough. But the worst thing was that when I increased the engine revs from idle, it initially began to shake rather wildly until the revs had built up to a certain level.

It had never done that before, and in fact since fitting the new scimitar blade prop, the engine has been running very smoothly indeed. On that day, I left it out for a few hours in the warm sunshine in case the problem was due to its being in the cold, damp hangar over the winter.

I didn’t restart the engine that day but I did the other day before I began to strip out the panel and this time the problem seemed to be even worse. Even before the engine had a chance to warm up I turned it off because the shaking was so bad that the whole of the nose seemed to be shaking as well and I was concerned about doing damage to the engine mountings.

I need to get the panel work finished so in the meantime while I’m doing that, I posted on the microlight forum asking for ideas about what the problem might be and the suggestion that rang the most bells and seemed most plausible to me was perished carburettor inlet rubbers.

Before leaving home today I checked through 77ASY’s papers and could find no information about when the carb rubbers might last have been changed. My guess is that if they have been, it was at least 5 years ago and probably more, so even without checking them more closely, just for my own peace of mind, I ordered a new pair before leaving the house. And lucky I did because before I left Malbec this afternoon, I wiggled the left carbrettor and it almost fell of in my hand and probably would have done if I’d kept on wiggling it.

So how lucky to discover that before taking off for my flight to the UK. And with hindsight, how fortunate that my last flight back at the end of December went off without incident, because on that occasion I was carrying a precious cargo – Wim’s granddaughter Danni. It just goes to show and makes you think, doesn’t it 😐

Another day

And this is how it started at dawn this morning. I woke up early, couldn’t get back to sleep and got up. And I’m glad I did because otherwise I’d have missed these gorgeous images of the sun just beginning to peep over the horizon. This was the view over the fields and mist-filled valleys in front of my house.

null

null

null

But after I’d got today’s chores out of the way, the day’s main task was to make a start on stripping out the Savannah’s instrument panel ready for its planned upgrade. The first shot was taken after I’d disconnected the choke cable.

null

The next shot was taken as I’d just started to pull the panel front forward having removed all of it’s fixings, the choke cable and the two throttle actuation rods.

null

The next three shots were taken from left to right as I began to pull the panel front further out. I was already seeing signs of trouble that were not wholly unexpected after my previous experiences with the Savannah’s wiring. I’ll come back to them in a moment but I’m super glad that I’ll be able to bring all of the behind-panel wiring up to the standard that I’ll be satisfied with.

null

null

null

The next shot is of the left hand side of the panel after I’d removed the trim and mag switches and the master key switch.

null

And here’s a shot showing the signs of trouble that I mentioned above.

null

At (1) you can see two bare connections of the 12V power supply cables for the electric turn indicator. As I found when I rewired the cabin overhead switch panel, whoever did the work was quite happy to make cable connections, in this case by soldering, and then just wrap them with insulating tape.

The trouble with that is clearly shown in the image. Over time the insulating tape’s adhesive dries out and the tape drops off, leaving the connections bare. If they had touched while live they would have shorted out with a real risk of causing a fire. Imagine that happening at 3000 feet over water or hostile terrain. It doesn’t bear thinking about.

But that’s not all. At (2) you can see some bare cut wire ends. These happen to be connected to the unused side of a 4-pole switch that has been used to power the electric turn indicator on and off. I don’t know if they are live or not but it doesn’t matter, you just don’t leave bare ends swinging in the wind like that.

Thank gooodness I’ll be able to deal with both of these issues, plus any others that I find during my panel upgrade. That’s as far as I got today because today’s efforts were mainly exploratory to find out what will be involved in removing the panel completely. Now I know I’ll be able hopefully to complete the job tomorrow when I will have all the items that I will need to hand.

Back in the barn

But only temporarily! The German supplier to whom I sent back the ATR833S radio has confirmed that it has arrived safely, but although advising that the new items that I wish to order are in stock and ready to be shipped out, hasn’t yet confirmed my revised order. So although I know that I should receive them in the next week or so, the delay is eating into the time available before my prospective April time windows for my flight to the UK.

I therefore have to get moving on the instrument panel redesign that I have planned for 77ASY. The sheet of lacquered aluminium that I ordered last week for the new panel front arrived today and knowing that this would be the case, I took the step over the week-end of moving the aircraft back up into the barn. The reason, as I found out when I did the screen replacement a couple of years or so ago (my, doesn’t time fly!), is that it will be much cleaner and brighter there to do the work.

It’s much too dark in the hangar, even with the doors open, and in any case, I don’t want to have the chore every day before starting work of having to open the doors, especially if it’s raining. Plus I can work in the barn relatively comfortably even if it is raining, just so long as it’s not also blowing a gale, unlike in the hangar where experience has shown that the bare earth floor soon becomes like a quagmire.

Here are some shots that I took of the Savannah in place in the barn together with the Weedhooper and ready for me to start work.

null

null

null

null

null

null

The first job is to strip out the existing panel, which I hope to be able to start doing tomorrow. As I’ve got to re-use the existing headset extension cables, I’ve decided to make up my own connection cables for both the radio and the transponder.

The latter is dead easy – just a power supply – but it will be much more complicated for the radio as unless I can get the information from Alphatec, I’ll have to work out the jack plug connections for myself. But in any case, if I bought the TQ radio connector cable (199€) I’d end up discarding most of it anyway. That or having another set of connectors away from the D-plug on the rear of the unit, which I want to avoid as it would just be a potential noise source.

As usual, I’ll record progress here in My Trike. I’m looking forward now to getting cracking, and there’ll be even more of an incentive when the new radio and transponder have arrived and I can hold them in my hot little hands 😉

Weird gremlins

You have to get used to things suddenly going awry here in France. The fact is, they’re not very good at running things here, things like systems, even just keeping things going that have been running OK for months if not years.

A case in point is our communications system – our fixed phones and internet. We have to accept that our internet only runs at the snail’s-pace speed of 2 MBs, the kind of speed that we kicked out of the UK 10 or more years ago. But what I personally cannot accept is that the telephone system just keeps dying without warning. And when it does, it takes the internet down with it of course.

It’s been doing it regularly for the past few evenings and it’s no good just re-booting the system and hoping that it will come back up again. It doesn’t, and only decides to when it wants to, often the next morning, and in the meantime you just have to accept being cut-off, except for your mobile.

And there’s no point thinking that technology will come to your rescue and that as you’re paying for a 4G connection on your mobile phone, you’ll be able to tether your PC to it and carry on surfing. Sorry, 4G down here also runs at a snail’s pace – slower actually than when your phone is connected via your home internet connection.

But just when you think that things couldn’t get any worse… they do. I’m desperate to sort out my Savannah radio and transponder issues as time is now running out for me to receive the kit and get it installed in advance of my possible time windows for flying to the UK. It didn’t help, of course, changing my plans and deciding to return the radio that I originally ordered and exchange it for a different unit because that lost me over a week when time was already tight. But the latest issue takes the biscuit.

I hung around all day yesterday waiting for an email from Germany telling me that the radio that I had returned had arrived back safely and that I could now amend my order and add a transponder to it. It didn’t come until nearly midnight but I decided that as time is now of the essence, I’d write a reply straight away, which I did. However, when I pressed the ‘Send’ button it transpired that my service provider, Free.fr, has now decided to classify all of my emails as spam and refused to send it.

I tried changing to one of my several other email addresses, but to no avail, my email resolutely remained in my ‘Out’ box. I tried rewriting it instead of just replying to the email that I’d received from the supplier, but still the same result. So well done Free.fr, at a moment when any kind of delay is critical for my plans to fly to the UK in a matter of a few weeks time, you’ve rendered me totally incommunicado.

But not quite. Fortunately I have the option of using a UK-based outgoing SMTP mail server for my micro-trike email address and I was able to get my message off this morning using that address rather than the personal one I’d used previously. Hopefully it won’t be confusing for the supplier when it drops into his ‘In’ box this morning and he’ll deal with it promptly.

But one thing repeatedly reveals itself whenever these kinds of issues arise, as they do frequently. If Mr Macron thinks that France has any kind of chance of grabbing business fom the City of London after Brexit, he’s kidding himself. The French communications system and infrastructure just don’t cut it and are years behind the UK, so the response has to be, ‘Not a Chance Monsieur!’

Savannah update

I mentioned in a previous post that I’d ordered a new f.u.n.k.e 8.33 kHz radio, and indeed I had. However, between ordering and receiving it I had a bit of a re-think.

As well as the radio, I also really need a Mode S transponder. More and more controlled airspace is being created the whole time and having to always fly around rather than through it, especially on longer flights such as when I fly to the UK, makes flight planning more difficult, flight times longer and flights themselves more arduous as a result.

I could just remove 77ASY’s panel and install the radio right now but that would leave the panel itself in an untidy mess with gaping holes in it and also needing to come out again and be completely revised at such time as I decided to fit a transponder. So it makes sense to bite the financial bullet and do the whole job just the once now, fit both the new radio and a transponder and do the panel design changes that will be required.

So what about the f.u.n.k.e radio? It’s based on a Dittel design and made under licence from TQ Systems who have since acquired Dittel (at least, that’s how I understand it). TQ and f.u.n.k.e each have a range of radios and transponders which are similar in design and functionality with the latter’s range being more expensive than the former’s and considerably more so in the case of the transponder. I had initially considered therefore buying the TQ transponder at some time in the future and on thinking about it decided that it really didn’t make sense to buy the f.u.n.k.e radio now if I was going to do that.

In fact I decided that it would make more sense to exchange the f.u.n.k.e radio immediately for the TQ version, and save a small amount of money by doing so, and to order the TQ transponder at the same time. So that’s what I’ve done. I contacted Fischer Flugzeugservice last week in the hope that I’d be able to make the order changes before the f.u.n.k.e radio had been shipped but was told that I was too late. I therefore had to wait for it to be delivered before immediately turning it around to send it back again without even opening the package.

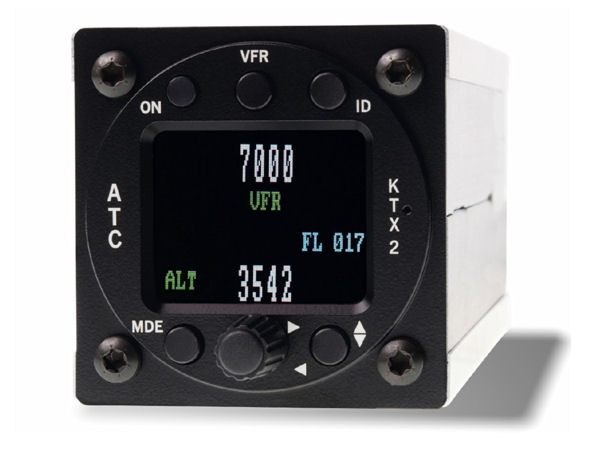
It makes sense to have an avionics package installed with units from the same supplier. This is obviously true from the point of view of aesthetics as it’s much easier on the eye if the products match, but technically it also makes sense to fit products that you know are compatible as there’s nothing worse than trying to trace and eradicate cross-interference or compatability issues between avionics products such as radios and transponders.

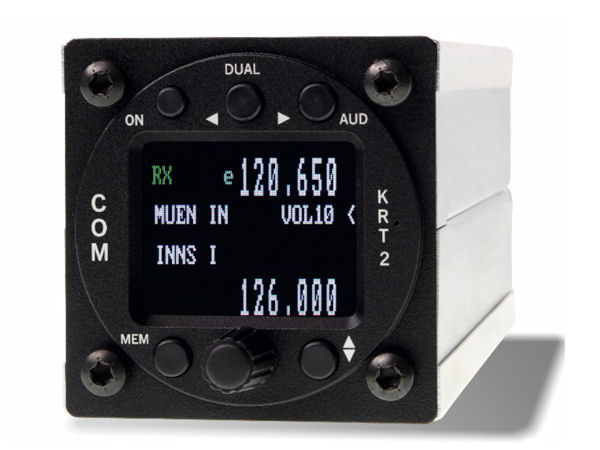
And as the following pictures show, the TQ products do match each other very well. First the TQ-KRT2 radio and then the TQ-KTX2 transponder.

null

null

So I’ve also had to think about the changes that I’ll have to make to 77ASY’s panel and here’s what I’ve come up with.

null

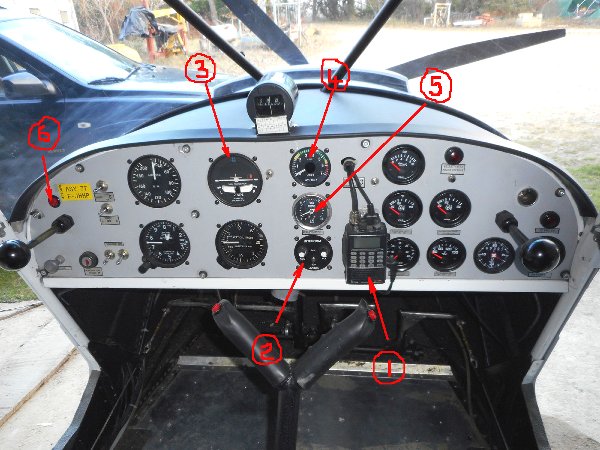
Here’s the panel as it looks currently by way of comparison.

null

As you can see, the old Icom radio (1) and Alphatec intercom (2) have been removed, together with the electric turn indicator (3), which is replaced by the ‘new’ 80mm revcounter that I recently came across on Le Bon Coin. The existing 57mm rev counter is also replaced by a slip ball and the fuel pressure gauge below it moved to be the top right in a revised bank of engine gauges on the right-hand side of the panel.

The space it was in is then filled with the new transponder and the space below that, which was previously occupied by the old intercom, with the new radio. The latter doesn’t have an ’emergency button’ facility as far as I’m aware, so the existing panel button (6) is also disposed of.

The redesign requires a certain amount of minor repositioning of gauges etc and as there would otherwise be several gaping holes remaining afterwards, I’ve also sourced a new sheet of aluminium from which to fabricate a completely new panel. As it is only 1.5mm thick, I’ve been able to source a sheet pre-lacquered on one side and I was very pleased to discover a supplier who could provide one with a satin ‘white aluminium’ finish that will look great without creating distracting reflections and the like.

I’ve also done another redesign in which I’ve shifted things around a bit more and created a space in the middle of the panel for my Asus 7″ tablet on which I run my MemoryMap navigation software. However, I need to do some more accurate measurements in order to confirm that the space is actually large enough so for the time being I’m just holding it on file as a possibilty. Clearly it would be a big advantage if I could get my tablet onto the panel as up to now it’s had to be held on a mount above the panel on the right-hand side, so not ideal by any means.

So I think that I’ve made the correct decision and I’m just waiting now for the f.u.n.k.e radio to arrive back with the supplier and for the replacement and the TQ transponder to be shipped out. I now have only one reservation, and it’s a major one. When I originally ordered the f.u.n.k.e radio, I would have had a choice between it and the TQ-KRT2. However, the supplier’s web site is now showing that the latter is out of stock and on a 2-3 week leadtime.

If this is so and I don’t receive it until the end of April, my plans to fly to the UK will be completely dusrupted as I’ll have missed the first two of my preferred windows. But there’s nothing I can do except wait and hope that things will turn out favourably 😕